ESP8266 boards
These boards are based on the 32-bit Tensilica Xtensa L106 microprocessor running at 80 MHz, with 4 Mbytes of flash and 80 Kbytes of RAM. They include integrated Wi-Fi.
For examples of using the Wi-Fi features see Wi-Fi examples, and for reference information see Wi-Fi extensions.
Note that on the ESP8266 the size of the stack is fixed, limiting the depth of recursion that uLisp will support. This means that some of the Benchmarks can't be run on the ESP8266. There doesn't appear to be a way to solve this, and for this reason I can't recommend the ESP8266 for uLisp.
Boards
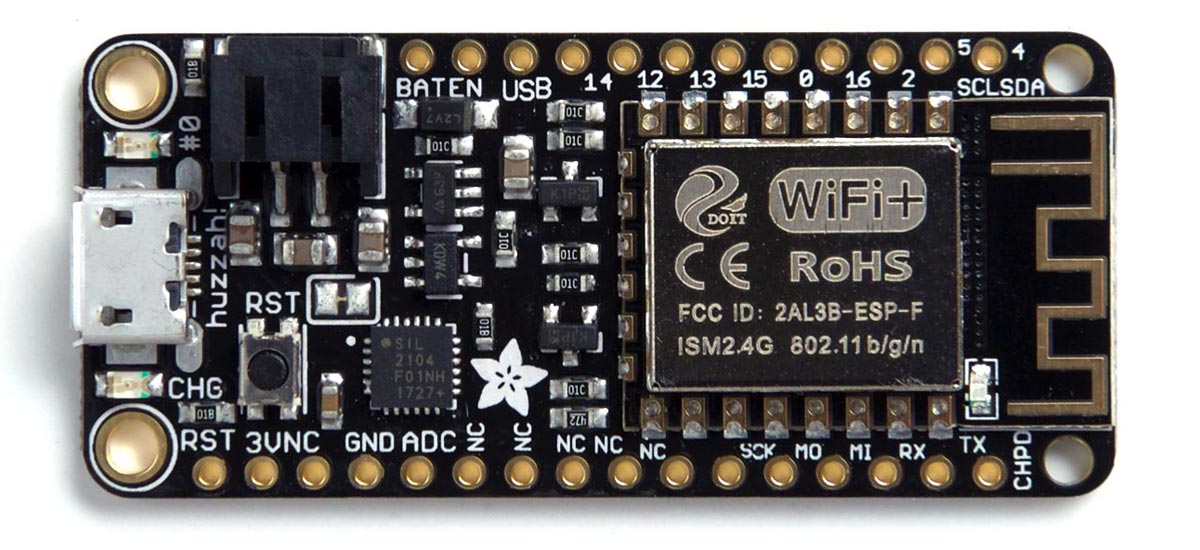
Adafruit Huzzah Feather
My recommended ESP8266 board is the Adafruit Huzzah Feather, an 80 MHz ESP8266-based board with 4 Mbytes of flash powered by Ai-Thinker’s ESP-12S. It's compatible with Adafruit's range of Feather add-ons, and includes a high-quality SiLabs CP2104 USB-Serial chip which supports uploading at 921600 baud. It also has auto-reset so you don't need to press buttons before uploading. It includes a built-in battery connector and battery charger for a LiPo battery.
LEDs
The Adafruit Huzzah Feather has a red LED connected to the GPIO pin 0, and a blue LED connected to the GPIO pin 2 which you can flash alternately with the following program:
(defun blink (x)
  (pinmode 0 t)
  (pinmode 2 t)
  (digitalwrite 0 x)
  (digitalwrite 2 (not x))
  (delay 1000)
  (blink (not x)))
Run it by typing:
(blink t)
Exit from the program by entering ~.
Any pin can also be used as an analogue pin, so you can pulsate the blue LED slowly on and off with the program:
(defun pulse ()
  (let (down)
    (loop
     (dotimes (x 1024)
       (delay 1)
       (analogwrite 2 (if down (- 1023 x) x)))
     (setq down (not down)))))
Run it by typing:
(pulse)
Exit from the program by entering ~.
Adafruit Huzzah Breakout
The Adafruit Huzzah Breakout is similar to the Adafruit Huzzah Feather, except that you have to provide your own USB-to-serial interface. I used Sparkfun's FTDI Basic Breakout [1]. You can use either a 5 V or a 3.3 V USB-to-serial interface as the Huzzah Breakout includes a 3.3 V regulator:
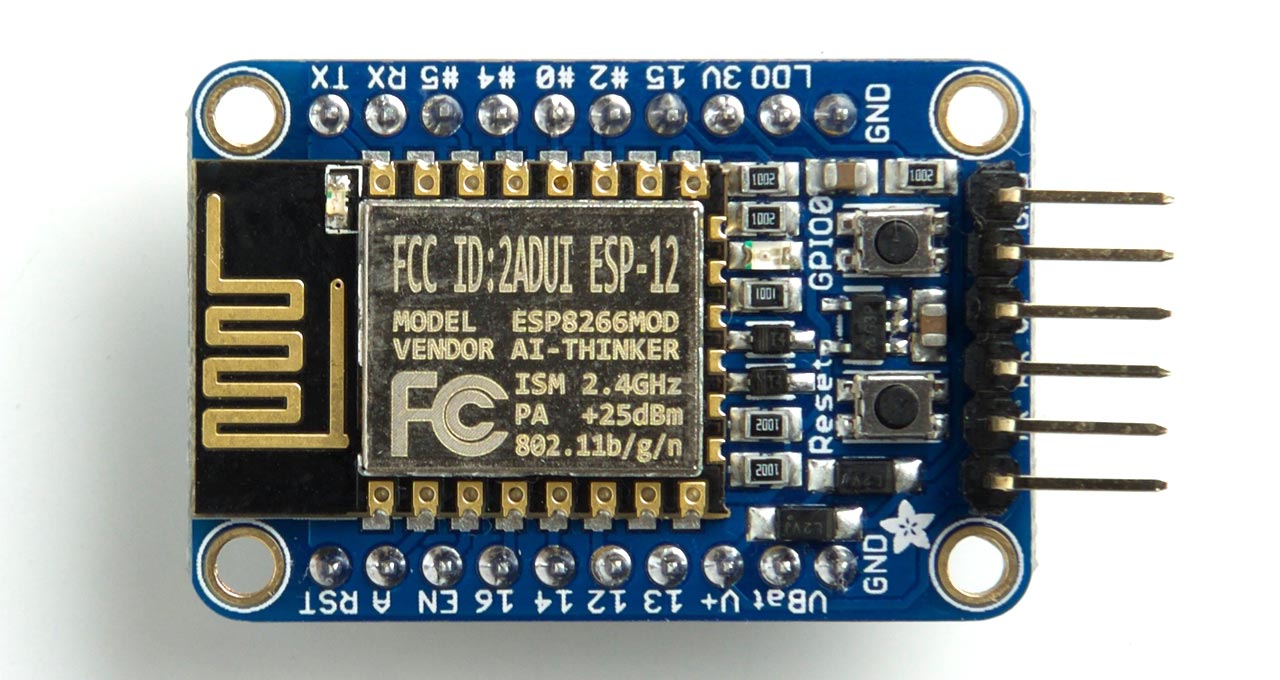
One negative feature about the board is that you have to press two buttons to enter the bootloader each time you want to upload a program from the Arduino IDE. Read the Adafruit Huzzah ESP8266 breakout instructions for uploading a program using the Arduino IDE.
LEDs
The Adafruit Huzzah Breakout has a red LED connected to the GPIO pin 0, and a blue LED connected to the GPIO pin 2 which you can flash alternately with the following program:
(defun blink (x)
  (pinmode 0 t)
  (pinmode 2 t)
  (digitalwrite 0 x)
  (digitalwrite 2 (not x))
  (delay 1000)
  (blink (not x)))
Run it by typing:
(blink t)
Exit from the program by entering ~.
Any pin can also be used as an analogue pin, so you can pulsate the blue LED slowly on and off with the program:
(defun pulse ()
  (let (down)
    (loop
     (dotimes (x 1024)
       (delay 1)
       (analogwrite 2 (if down (- 1023 x) x)))
     (setq down (not down)))))
Run it by typing:
(pulse)
NodeMCU
The NodeMCU is widely available at low cost on sites such as Banggood, eBay, and Aliexpress. It's based on the ESP8266-12E and includes 4 Mbytes of Flash. Two versions of the board are available: with the CP2104 USB-Serial chip, or with the CH340 USB-serial chip. You can tell the difference from the shape of the chip next to the USB socket. I chose the CP2102 version as it is reputed to have better driver support on the Mac than the CH340:
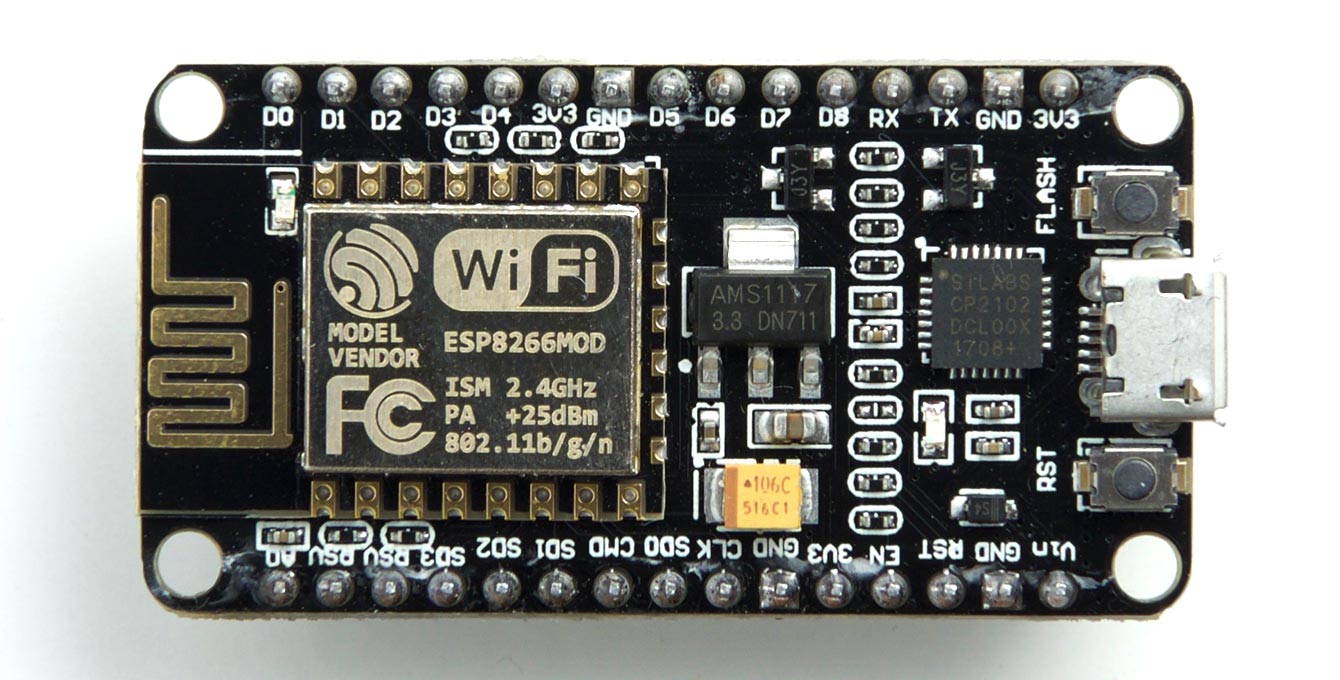
11 I/O pins are accessible on the board, labelled D0 to D10. These correspond to the following pin numbers, as used by the uLisp routines such as pinmode, digitalread, digitalwrite, analogwrite, and note:
| Label: | D0 | D1 | D2 | D3 | D4 | D5 | D6 | D7 | D8 | D9 | D10 |
| Pin: | 16 | 5 | 4 | 0 | 2 | 14 | 12 | 13 | 15 | 3 | 1 |
LEDs
The NodeMCU board has two blue LEDs on GPIO pins 2 and 16. You can flash them alternately with the following program:
(defun blink (x)
  (pinmode 2 t)
  (pinmode 16 t)
  (digitalwrite 2 x)
  (digitalwrite 16 (not x))
  (delay 1000)
  (blink (not x)))
Run it by typing:
(blink t)
Exit from the program by entering ~.
Any pin can also be used as an analogue pin, so you can pulsate the blue LED on GPIO 2 slowly on and off with the program:
(defun pulse ()
  (let (down)
    (loop
     (dotimes (x 1024)
       (delay 1)
       (analogwrite 2 (if down (- 1023 x) x)))
     (setq down (not down)))))
Run it by typing:
(pulse)
Exit from the program by entering ~.
Acknowledgements
I'd like to thank Holger Zahnleiter and Jan Delgado for getting the first version of uLisp working on the ESP8266. Also, the ESP8266 version of uLisp wouldn't be possible without Ivan Grokhotkov's amazing work on the Arduino Core for the ESP8266.
- ^ SparkFun FTDI Basic Breakout - 5V on SparkFun.