Adafruit PyGamer and PyBadge
The Adafruit PyGamer, PyBadge, and PyBadge LC boards would be good platforms for experimenting with writing your own games in Lisp. They each incorporate a 1.8" 160x128 colour TFT display, and are based on the ATSAMD51.
The ARM version of uLisp includes graphics extensions, to allow you to plot points, lines, shapes, and text to the PyGamer, PyBadge, or PyBadge LC colour TFT display. It also includes an ARM assembler that allows you to generate machine-code functions, integrated with Lisp, written in ARM code. The assembler itself is written in Lisp to make it easy to extend it or add new instructions.
Graphics extensions
For reference information about the graphics extensions see: Graphics extensions.
For some demo graphics programs see: Graphics utilities.
ARM assembler
For an overview of the ARM assembler and details of how to install it see: ARM assembler overview.
For a summary of the instructions in the RISC-V assembler see: ARM assembler instructions.
For example programs see: ARM assembler examples.
Adafruit PyGamer
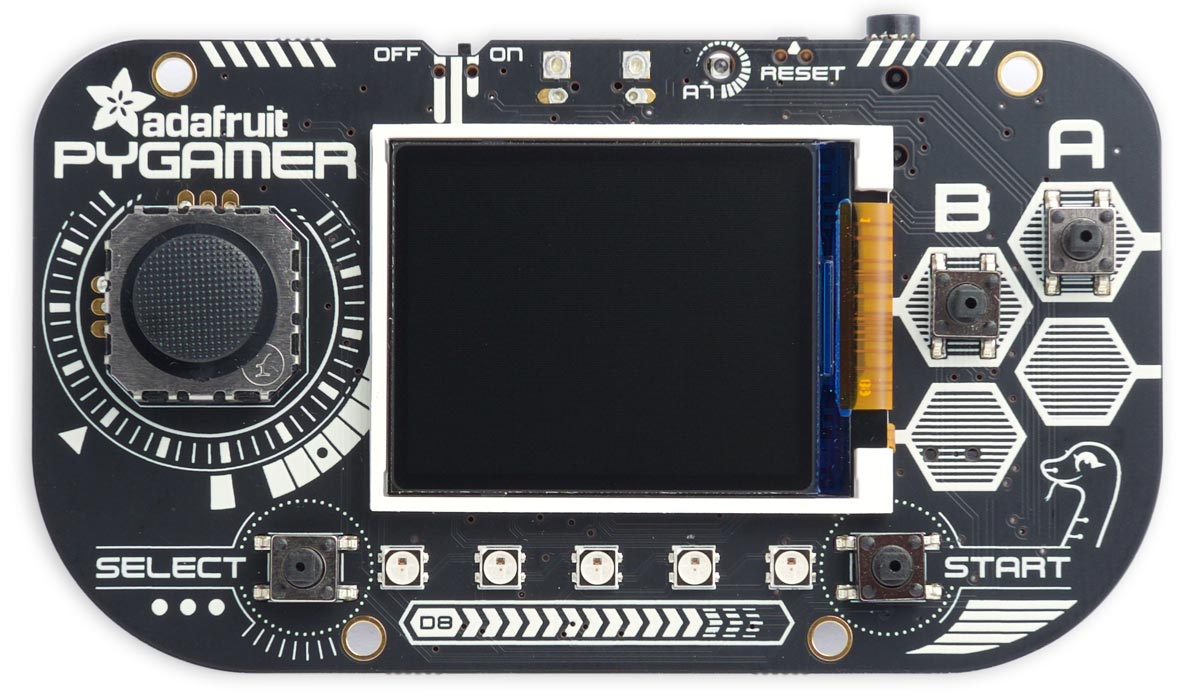
The PyGamer is available from Adafruit [1], or Mouser in the UK [2]. It incorporates a four-way joystick instead of the direction buttons.
Adafruit PyBadge
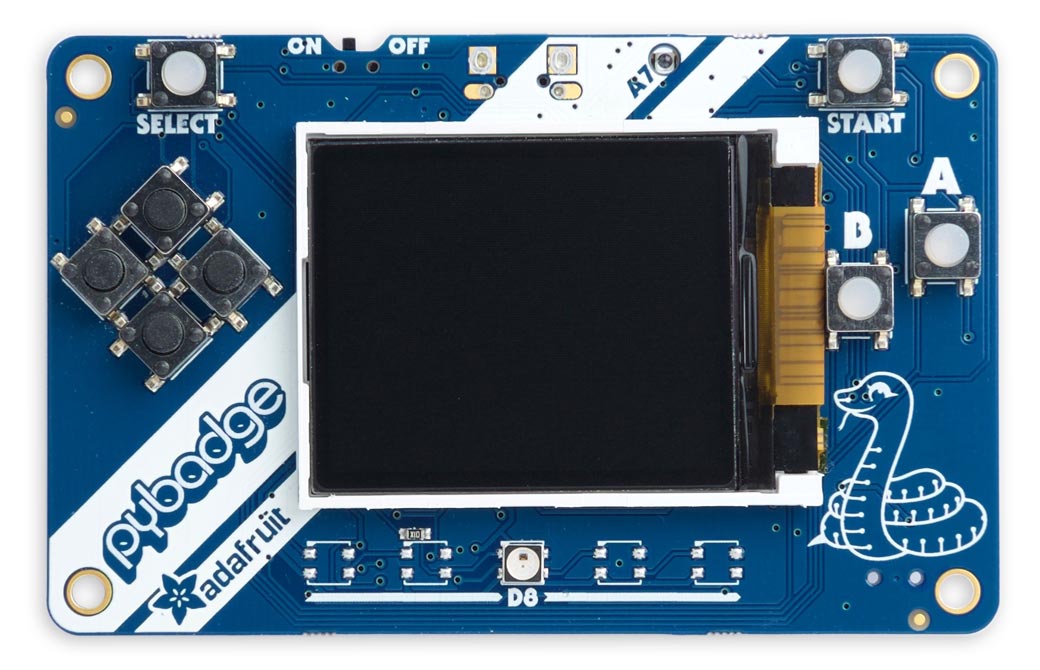
The PyBadge [3], and the lower-cost PyBadge LC (shown above) [4], are available from Adafruit, and from Pimoroni in the UK [5]. They each have four directional pushbuttons.
Interfaces
Many of the features are common to all three boards.
LED
The PyGamer and PyBadge have a red LED on the back of the board which you can flash with the following program:
(defun blink (&optional x)
  (pinmode :led-builtin t)
  (digitalwrite :led-builtin x)
  (delay 1000)
  (blink (not x)))
Run it by typing:
(blink)
All pins can also be used for analogue (PWM) output, so you can pulsate the LED slowly on and off with the program:
(defun pulse ()
  (let (down)
    (loop
     (dotimes (x 256)
       (delay 5)
       (analogwrite :led-builtin (if down (- 255 x) x)))
     (setq down (not down)))))
Run it by typing:
(pulse)
Exit from either program by entering ~.
Analogue inputs
The PyGamer has 12 analogue inputs on pins 14 (A0) to 25 (A11), and the PyBadge has 10 on pins 14 (A0) to 23 (A9).
Analogue outputs
The PyGamer has PWM analogue outputs on pins 4, 7, 9, 12, 13, 26, 27, 46, and 47.
The PyBadge has PWM analogue outputs on pins 4, 7, 9, 12, 13, 24, 25, 46, and 47.
Serial
The PyGamer and PyBadge have a serial port on pin numbers 1 (TX) and 0 (RX).
SPI
The PyGamer and PyBadge have one accessible SPI port on pin numbers 28 (MISO), 29 (MOSI), and 30 (SCK).
I2C
The PyGamer has one I2C port on pin numbers 26 (SDA) and 27 (SCL), and the PyBadge has one I2C port on pin numbers 24 (SDA) and 25 (SCL). They are accessible on the Stemma connector.
PyBadge pushbuttons
The eight pushbuttons on the PyBadge are connected to an 8-bit 74165 shift register, and to read them you have to shift the bits into the shift register and then read the 8-bit value. They are indicated by a single 8-bit value:

The routine readbadgebuttons returns an 8-bit number where each bit represents the state of one of the 8 keys on the keypad:
(defun readbadgebuttons ()
  (let ((buttons 0) (clock 48) (data 49) (latch 50))
    (pinmode clock t) (digitalwrite clock 0)
    (pinmode latch t) (digitalwrite latch 1)
    (pinmode data nil)
    (digitalwrite latch 0) (digitalwrite latch 1)
    (dotimes (b 8 buttons)
      (setq
       buttons
       (logior (ash buttons 1) (if (digitalread data) 1 0)))
      (digitalwrite clock 1) (digitalwrite clock 0))))
PyGamer joystick
The PyGamer incorporates an analogue joystick. You can read it with the following routine:
(defun joystick ()
  (let ((x 0) (x0 536) (y 0) (y0 523))
    (dotimes (s 3) (incf x (analogread 25)) (incf y (analogread 24)))
    (list (- (truncate x 3) x0) (- (truncate y 3) y0))))
It returns a number between -512 (left) and 511 (right) for the x direction, and -512 (up) to 512 (down) for the y direction. You can change the values of x0 and y0 to get close to zero for the centre position.
PyGamer pushbuttons
The four pushbuttons on the PyGamer are connected to an 8-bit 74165 shift register, and to read them you have to shift the bits into the shift register and then read the 8-bit value. They are indicated by a single 8-bit value:
The routine readgamerbuttons returns an 8-bit number where each bit represents the state of one of the 8 keys on the keypad. It sets the bottom four bits according to the position of the joystick, for compatibility with the PyBadge:
(defun readgamerbuttons ()
  (let ((buttons 0) (clock 48) (data 49) (latch 50))
    (pinmode clock t) (digitalWrite clock 0)
    (pinmode latch t) (digitalWrite latch 1)
    (pinmode data nil)
    (digitalwrite latch 0) (digitalWrite latch 1)
    (dotimes (b 8 buttons)
      (setq
       buttons
       (logior (ash buttons 1) (if (digitalread data) 1 0)))
      (digitalwrite clock 1) (digitalwrite clock 0))
    (let* ((j (joystick))
           (x (first j))
           (y (second j)))
      (logior
       buttons
       (cond ((< x -350) 1) ((< y -350) 2) ((> y 350) 4) ((> x 350) 8) (t 0))))))
Sound
The PyBadge and PyBadge LC include an audio amplifier connected to analogue output A0, which corresponds to Arduino pin 14. By default the board includes a mini-speaker, but you can optionally disconnect this and fit a better quality speaker to the output of the amplifier.
To make sounds you first need to enable the amplifier with:
(digitalwrite 51 1)
The following function sound makes a simple frequency sweep effect:
(defun sound ()
  (dotimes (y 96) (dotimes (x y) (analogwrite 14 (* 16 x)))))
The PyGamer doesn't include a mini-speaker, but analogue outputs A0 (Arduino pin 14) and A1 (Arduino pin 15) are taken to the two channels of a stereo headphone socket, and to the inputs of a mono amplifier so you can add an optional speaker.
Battery
You can read the battery voltage with the following routine:
(defun battery () (* (/ (analogread 20) 1023) 2.0 3.3))
It returns the voltage as a floating-point number.
Light sensor
There's a light sensor above the display which you can read with the following routine:
(defun light-sensor () (analogread 21))
It returns an integer between 0 (dark) and 1023 (bright).
Display backlight
You can change the display backlight with the following routine:
(defun backlight (n) (analogwrite 47 n))
It takes a number between 0 (dim) and 255 (normal).
Accelerometer
The PyGamer and PyBadge (but not PyBadge LC) include an LIS3DH accelerometer.
By default the sensor is in low-power mode, so to take readings you need to set the rate. The following routine lis3dh-rate takes a parameter from 0 to 9:
(defun lis3dh-rate (x)
  (with-i2c (s #x19)
    (write-byte #x20 s)
    (write-byte (logior (ash x 4) 7) s)))
For example (rate 2) gives a 10Hz sample rate.
The following routine lis3dh-xyz then returns the acceleration data as a list of three signed integers.
(defun lis3dh-xyz ()
  (with-i2c (s #x19)
    (write-byte (+ #x28 #x80) s)
    (restart-i2c s 6)
    (let (dat)
      (dotimes (i 3) (push (s16 s) dat))
      (reverse dat))))
It uses this routine s16 to give a signed 16-bit integer from two bytes, LSB first:
(defun s16 (s)
  (let ((d (logior (read-byte s) (ash (read-byte s) 8))))
    (- d (ash (logand d #x8000) 1))))
At the default full-scale sensitivity, 2g, a value of 32767 represents 2g and -32768 represents -2g.For example:
> (xyz)
(300 412 -16768)
If the PyBadge or PyGamer is flat on a table the x and y figures will be close to zero, and the z value will be close to -16384, corresponding to -1g because the sensor is on the back of the board.
Etch-a-sketch
PyBadge
Here's a simple etch-a-sketch program, badgesketch, for the PyBadge that lets you draw with the direction buttons:
(defun badgesketch ()
  (let ((x 80) (y 64))
    (loop
     (let* ((r (readbadgebuttons))
            (dy (- (logand 1 (ash r -2)) (logand 1 (ash r -1))))
            (dx (- (logand 1 (ash r -3)) (logand 1 r))))
       (if (> r 32) (fill-screen 0))
       (draw-line x y (incf x dx) (incf y dy))
       (delay 10)))))
PyGamer
Here's a simple etch-a-sketch program, gamersketch, for the PyGamer that lets you draw with the joystick:
(defun gamersketch ()
  (let ((x0 80) (y0 64))
    (loop
     (let* ((r (readgamerbuttons))
            (j (joystick))
            (x (+ 80 (truncate (* (first j) 80) 512)))
            (y (+ 64 (truncate (* (second j) 64) 512))))
       (if (> r 32) (fill-screen 0))
       (draw-line x0 y0 x y)
       (setq x0 x y0 y)
       (delay 10)))))
Press A or B to clear the screen.
- ^ Adafruit PyGamer board on Adafruit.
- ^ Adafruit PyGamer on Mouser.co.uk.
- ^ Adafruit PyBadge board on Adafruit.
- ^ Adafruit PyBadge LC Board on Adafruit.
- ^ Adafruit PyBadge LC on Pimoroni.